It’s a safe bet to assume that everyone reading this article has made a slide deck at least once in their lives. There’s nothing new or fancy about them as everyone is familiar with their purpose. The reason why we would like to shed some light on the subject is that slide decks are particularly utilized in bulk for online learning. Some new platforms and tools are often used to communicate information and bridge the gap between the learner and the instructor. However, many have become obsolete and haven’t stood the test of time. Despite their limitations though, slide decks remain the most time and cost-efficient way to communicate data and information.
However, when it comes to the quality of presentations, many lack visual strength which can be potentially damaging. If an online course has a slide deck that learners simply must read through, and no instructor is guiding them through it. A poorly designed presentation could lead to confusion and misinterpretation. An example of this is a poor template layout which may lead to incorrect or confusing navigation through the text. While we agree that visuals should be treated as a secondary aspect of any form of presentation, they should not be ignored. Visuals support the information that you’re presenting and possibly bridge certain gaps of communication that plain text simply cannot do. A well-designed and put-together slide deck will not only uplift your presentation but keep the viewer intrigued. But before we get into that we have some reality checks that we would like to highlight.
Some Truth Bombs
1. Don’t blindly use templates for your slide deck
We’ve all seen those perfectly aligned, visually vibrant, perfectly balanced, and easy-to-read presentations. These polished slide decks are present in your Pinterest boards, they could be the reference you downloaded or even ready-made templates from various sources. However, when you use these templates or attempt to make something similar it never looks as good. The truth is that for your presentation to look the same as those beautiful references is a rare occurrence. And the reality of the situation is that it will never happen. Treat these templates or references as advertisements just like that instant cake which never looks as appetizingly glossy on your plate as it does on the box. These templates or references with high-res stunning imagery and just the right amount of dummy text is a pre-packaged polished display to give you an idea of what a nice deck should look like. However, an unpredictable amount of information, quality of imagery, and creative restrictions often don’t allow us to make them perfect. Don’t give in to the allure of completely copying other templates. Instead, stir up your creative juices. You won’t regret it!
2. The world judges a book by its cover (sadly)
This is an unfortunate fact especially when it comes to PowerPoint Presentation (ppt) decks in online courses, particularly in instances where a learner doesn’t have an instructor present guiding them through it. We don’t suggest that the way you make things look is all that matters, of course not. However, psychologically speaking anything visually pleasant will make a good case for your slide deck. Learners will grasp the knowledge well and put them in a better learning state of mind, pleasant visuals in any form whether it’s an image, an infographic, or a chart all bring a breather in between tons of text.
3. Few have the patience to read piles of text
Yes, we want to send our learners as much info as we possibly can but unless they’re reading a pdf or a book it’s unlikely that they would go through a slide deck piled with paragraphs with their attention fully intact. Decks are meant to simplify and filling them with a lot of text is never a good idea as no one will read it.
So, after reading this, one question that might pop up is whether you have to be a designer or a creative person to make that visually pleasing presentation. The answer in three words is NO Absolutely NOT. You can be from any professional background and still be able to follow our tips. All you need are your basic ppt making skills and you’re good to go.
Try these practical tips for your slide deck
1. Text for the slide deck
We start with tackling the core subject – the text. It’s crucial that everything you put on your slides is legible and correctly interpreted by your learners. For that, we suggest some easy-to-follow presentation rules for the text.
Alignment
Always keep your text alignment as consistent as possible. If you choose a left alignment, try to keep that way throughout, the same rule applies for a center alignment, a right alignment is rarely used and not a good idea as it isn’t the easiest to read through.
Fonts
There are two types of fonts – Serif and Sans serif. A serif font has a small line or a stroke or line, attached at the end of each letter or symbol. Some well-known examples of these are Times New Roman and Baskerville. A sans-serif font on the other hand (you French speakers guessed it right) is without a stroke or line attached at the end of each letter. Some common examples of these are Arial and Helvetica. The reason why it’s good to know is that it’s beneficial to give some thought to the font you pick, while we trust you won’t pick comic sans (duh), using serif fonts everywhere may not be a great idea. Sans-serif fonts are more legible and easier to read. Unless it’s essential – stick to a serif font. If you must use serif fonts, use them for sections like a quote or a testimonial, basically use them sparingly.
Size and Spacing
Try to keep your paragraph/body text to be at least 30-point size, anything smaller than that would be difficult to read. When it comes to line spacing try to keep it 1,15 or if possible, even 1,5 as the space between the lines makes the reading experience better for your learners. Do not overlap the text as nothing is worse than reading a cluttered slide, it just makes the viewer jittery and agitated and there is not much soaking of knowledge in the experience.
2. Layout
Sure, this may seem like a complex subject and often overwhelming for people who don’t look at things from a creative perspective, but you would be surprised at how simple the whole thing is. Not only is it an easy fix but surprisingly quick.
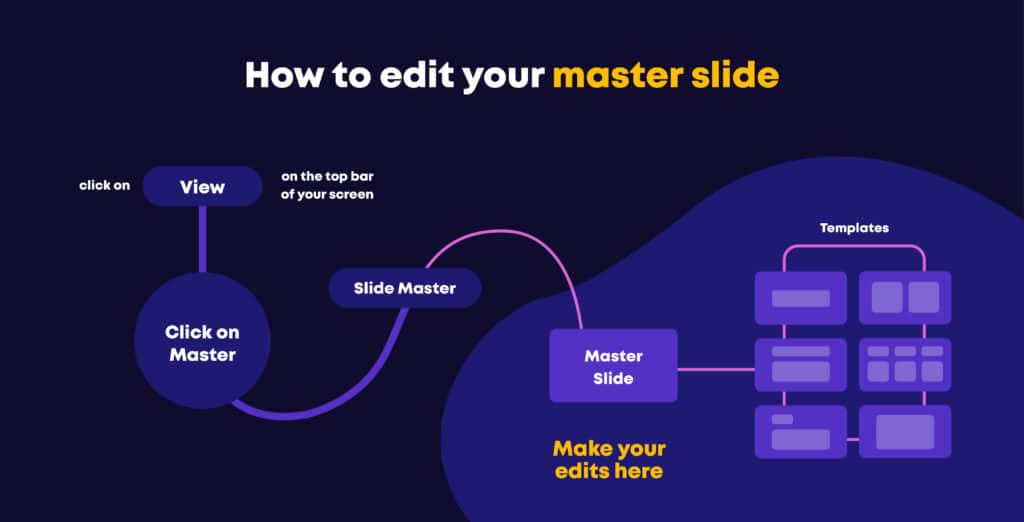
Edit your master slide
Guess what? This is a huge time saver and not everyone knows about this. A master slide is like a nucleus to your deck. If you switch the fonts in the master slide you don’t have to do it again, it automatically does it for every slide on your slide deck. If you want every slide to have your company/ institute’s logo you certainly don’t need to copy-paste this everywhere. Just paste it into the main master slide. If you want to adjust other layouts in the template, you can do that in the master option too. You can adjust the title & content slide or the section header slide by simply adjusting your master.
Match the right layout
The quantity of information you’d like to add to each slide is something you should plan. It’s a huge time saver if you know which slide works well with which template format. For example, it’s very common to use the layout title and content layout for an introduction slide, but what if your introduction is not a simple paragraph and you need to add an infographic and an image along with an introductory paragraph you can save yourself some time adjusting layouts and simply use the comparison slide.
3. Imagery
Here comes a tricky subject. Here’s where a lot of disappointment with existing templates comes (especially where money has been spent). Often, we don’t have great imagery to work with. It’s not a beautifully captured shot but it is an essential piece that you need to add to your slide deck. Some examples of such messes are blurry, plain, or boring imagery. So, what does one do with that? Here are some ways you could tackle the problem:
Blurry Imagery
For blurry imagery, there’s a way to fix the resolution of the ppt. There is a feature on ppt that helps with this. This may not give you the clarity and sharpness that you see in high resolution, but it will be an improvement. The instructions of which can be found in this article How to Fix Powerpoint Low Resolution Pictures?
Boring Imagery
If the imagery is too boring, one way to jazz it up is to mask it in a shape. How do you do that? It’s simple. Under the picture format panel, you click on the crop tab where there’s the option in a roping shape. Go ahead and make your choice. We recommend that you start with something safe like a rectangle or a circle – but you can experiment if you feel like it.
Clashing Imagery
This is a frequent problem, especially with imagery from multiple sources. Don’t worry if you experience this situation. There is a simple way to tackle this and that’s by keeping the slides minimal and colourless. Stick to white, beige, or very light grey backgrounds as they will bring a sense of cohesion in the imagery and minimalism will tone down the chaos.
How to Use Stock Imagery
If you are in that sweet spot where the imagery has not been decided yet and it is up to you – there are countless sources like unsplash and Pixabay where you can download imagery. And here’s where you can bring a sense of cohesion, try to pick photos from the same shoot, the suggestions from the same shoot would most likely be present if you scroll down from the image, you are looking at. Try to spot similar colours or moods in the imagery you are looking at, e.g. If it’s a slide deck on training for teamwork, try using multiple images of people working together with all looking jovial. The cohesion in imagery would make such a difference and give the deck that premium look.
4. Visuals
A picture is worth a thousand words. An amazing infographic may be worth 500 words (ok our tip is not as terrible as our sense of humour). What we mean is that an infographic or an illustration can cut down words by half and provide a lot of information and occupy less space.
Iconography
Iconography is the easiest way to cram a lot of information in a symbolic manner. It may also be a good way to use iconography as a source of context. E.g., if you have defined an idea in a paragraph and used a lightbulb as a visual to support it, you can use the same lightbulb icon as a representation of the idea in a flow chart or a project timeline. There are several sources such as noun-project or freepik where you can download packs of iconography sources.
Visualization Tools for Infographics
When it comes to infographics or any form of data visualization, we think of the obvious bar charts, pie charts etc. These are tools that one must use and of course, customize them, which is something we will get to in our branding section. But you can explore more. Use timelines, flow charts, conceptual infographics to showcase your concepts, ideas, data etc. Some great sources for these are freepik, visme and infogram.
Illustrations
Though often treated as an afterthought, illustrations can be quite a game-changer in how your slide deck looks. Sometimes you may not find imagery that suits the exaggerated emotion you are trying to showcase. Here’s where illustrations come to the rescue. Sometimes the visual of a cartoon cat looking confused while looking at a course is a lot more effective than a stock photo of a person with the same expression. The boldness of an illustration brings that exaggeration that we need to showcase the objective of what’s written. Some great sources for these are freepik and undraw.
5. Branding
This tip is not restricted to a company or an institution. Regardless of who’s making the slide deck whether it’s a one-person company or a start-up at a very early stage that is still discovering itself, branding oneself is a huge booster. What we mean by branding is representing something of yourself in the presentation. If you have an existing branding manual to treat as a reference that’s awesome, please follow it and incorporate it in the presentation. However, if that’s not the case and you don’t have a sense of identity yet, you can still bring some branding elements. Here are a few effective branding tips:
Unique Fonts
Pair together fonts that are unique and not often used, try something outside the norm, think outside Arial or Helvetica. Try downloading something new and popular like Montserrat and install it (all you need to do is double click the font once you download it). View some popular pairings of fonts many of which are free.
Colours
If you don’t have concrete brand colours yet, look for something that represents the information on the slide deck. A black and white presentation does not make sense if the course is on nature, pick nature-based tones like green and browns and use them against a beige background. You can simply pick these tones from any image you see. If you don’t have photoshop, you can pick colour hex codes online by uploading the image on sources like colour-picker. If you don’t feel confident in picking colours you can use online tools that can make palettes for you. All you have to do is type keywords and post them into a source. A great source for this is coolors.
Read: How to Make Videos for Online Courses
These tips are for people who want to improve their presentations and are drawing a blank on where to start. This is a good starting point and of course, there’s always more to explore and learn. Follow these tips and your next course’s slides will certainly NOT SUCK!
Looking for more insights? Check out our recent blog post on where training goes wrong and how to change it.